Have you wanted to try macro photography but didn’t want to spend the money on a new lens? Well if you’re like me and have been living under a rock, you don’t have to spend hundreds of dollars on a new lens thanks to something called a reverse ring adapter. I had heard the term for years but I guess I’ve never looked into it before because I’ve always had a dedicated macro lens. You can use a lens you already own, slap a reverse ring on it, and now you have a macro lens! Certain lenses will work better than others and some won’t work at all, but I happened to have a Sony FE 35mm f/1.8 prime lens which is a good candidate to be used with a reverse ring and converted into a macro lens. The ideal lens to use with a reverse ring is a fully manual lens which you can adjust the aperture directly on the lens. While attached via a reverse ring there will be no electrical connection/communication between the lens and camera, which makes manual lenses the best option. If you are using an automatic lens that lacks the ability to manually adjust aperture, set the aperture with the lens attached normally to your camera first, then flip it around so it is attached using the reverse ring. I leave the camera on and lock the settings (AEL/AE-L button) before reversing it and that seems to work just fine. Look inside your lens to make sure it maintained the aperture you set.
How it works:
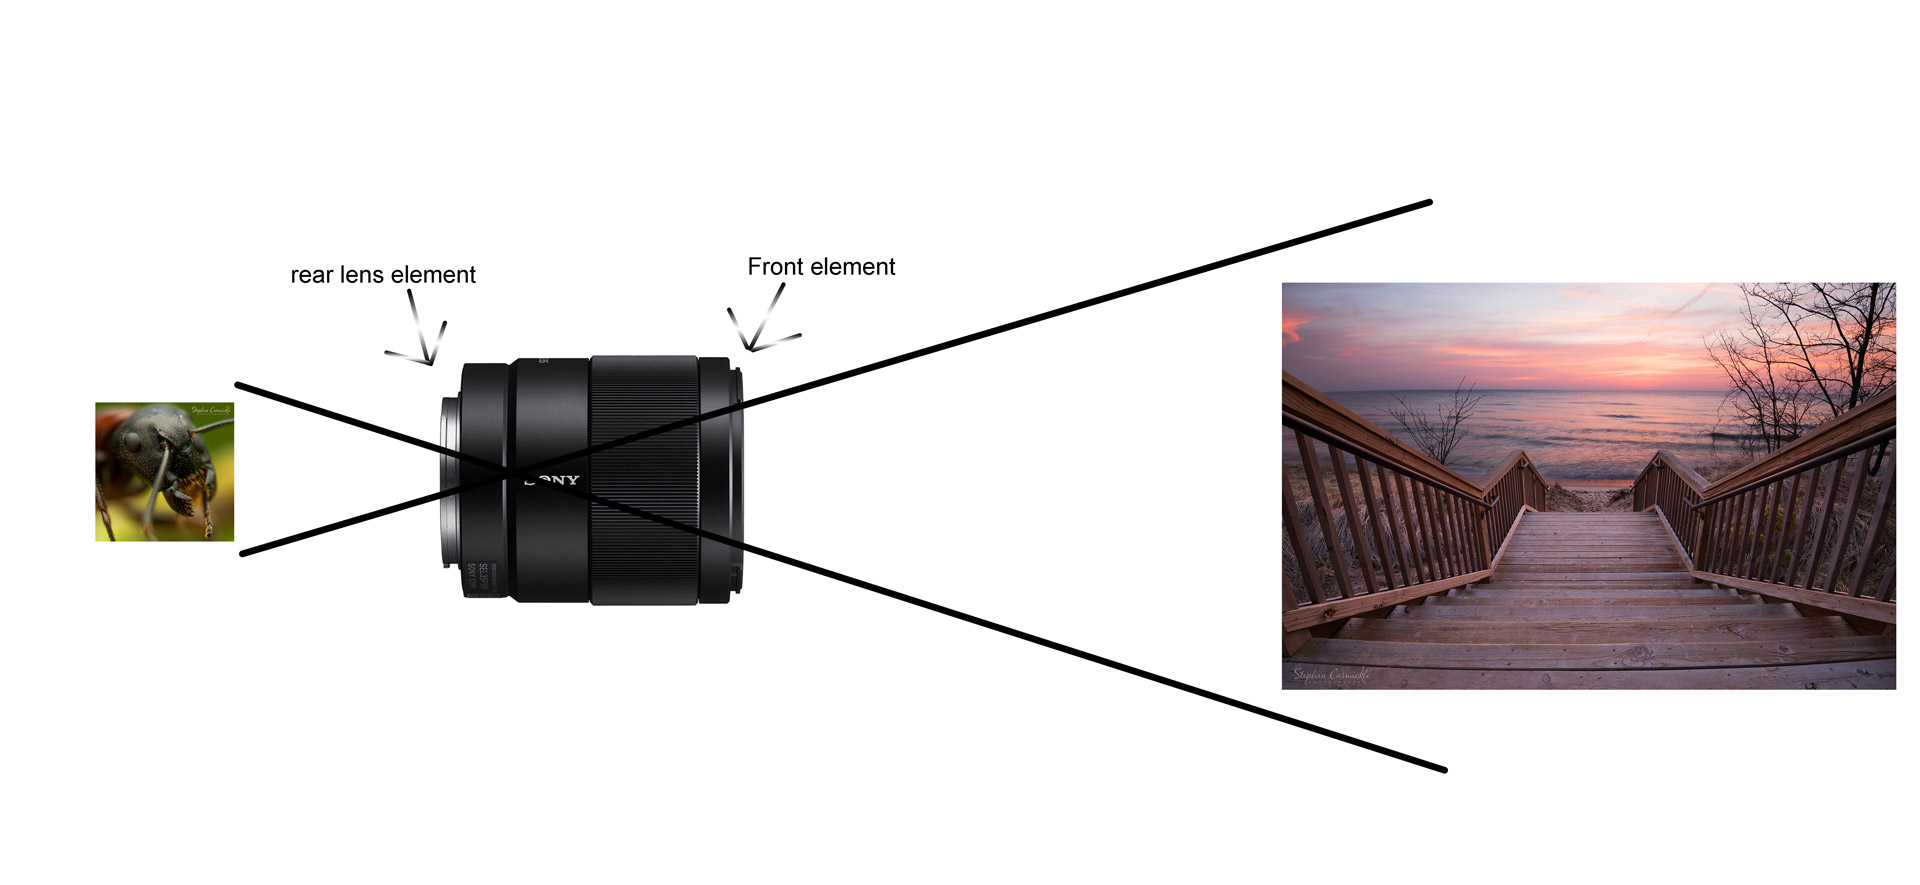
As you can see from my masterful visual that I copied from a google search, the rear lens element (normally used to redirect light onto the sensor) is better suited for smaller subjects at a much closer working distance to the lens than the front element, which you probably use for vast landscapes, portraits and other larger subjects. The reverse ring screws onto the front of your lens like a UV or polarizer filter then mounts directly to the camera. A 50mm lens will give you a 1:1 magnification ratio and any focal lengths lower than 50mm will grant even greater magnification. Focal lengths from 50mm-28mm are most popular.

Verdict:
Would I use a reverse ring as my main macro photo lens? Probably not. But it is something I will definitely use from time to time. Using my 35mm portrait lens is much more lightweight compared to my two other macro lenses which is a relief on my wrist that has been experiencing pain with my heavier setups. But if you want to dip your toes into macro photography for the first time or can’t/don’t want to buy a new macro lens for hundreds or thousands of dollars, then spending just $7.95 to convert a lens you already own into a macro lens is a really good deal! I wish I had tried this sooner!
Tin Foil Diffuser:
Below is my 1st attempt at a DIY Diffuser. Cardboard lined with tin foil wrapped around this diffuser I bought on amazon. This design is not good because it does leak a bit of light and the diffuser in front doesn’t block/scatter light well enough in my opinion. I wouldn’t use the cardboard exterior and instead just attach tin foil around the diffuser and wrap it in a dome-like fashion around the flash.

Here is my 2nd attempt at a DIY diffuser. This 2nd worked much better because by just using tin foil I was able to sculpt it much better to contain all of the light from the flash. The front piece is from my MKDiffuser but you can instead use a regular piece of computer paper or buy some diffuser cloth or plastic on amazon or B&H.
DIY MACRO DIFFUSER – Google search

Feel free to leave any other tips, tricks, gear recommendations or general information in the comments below. 🔽